As I have promised in my previous blog regarding curation of chemogenomics data, this time I will be talking about standardization of compound structure data. Specifically, I will be explaining how we used ChEMBL Structure Pipeline (CSP) to do just that, with a few additions/modifications to the actual usage explained in this link. As you may have known already, that link also explains how you can install CSP. However, I will be giving you a much better option of installing the CSP within a contained environment. Yes, you guessed it! That is, by also installing the Anaconda toolkit.
So , without further ado, I’ll dive right into it.
Installation of ChEMBL Structure Pipeline
As I have mentioned earlier, I will be telling you, in my honest opinion, a much better option for installing CSP and that is, by installing it within an Anaconda environment. Well, I will not be telling you about the Anaconda toolkit itself but you can follow this link if you want to know more. If you are a heavy python user, then, I assume you already know about it and probably already enjoying its usefulness. However, if you are new to it, I am sure it will be worth your while to try it. I would like to tell you first that I am assuming you are using a Linux machine. If you are a Windows user, most of the things you’ll find here will still be useful, though, especially with regard to compound structure standardization, so please read on. Now, enough for the talk and let us download Anaconda.
There are two ways by which you can download and install Anaconda: (1) by following the instructions on this site or (2) by following the shortened instructions below.
In the Linux terminal, select or create a subdirectory where you would like to download the installer and enter it. Then execute the command below. By the time you are reading this, the download link might have changed so please check it through this link. Make sure to use the download URL for the 64-Bit (x86) Installer.
$ wget https://repo.anaconda.com/archive/Anaconda3-2021.05-Linux-x86_64.shOnce the download is finished, start the installation by executing the following command.
$ bash ./Anaconda3-2021.05-Linux-x86_64.shJust follow the instructions to continue installation. I suggest that you accept the default installation directory and also allow it to initialize the installer. I am sure it will be annoying for you if the default (base) Anaconda environment gets activated whenever you open the terminal. To prevent it from doing so, just execute the command below. Close and then reopen the terminal to enable the Anaconda settings.
$ conda config --set auto_activate_base FalseNow, let us proceed to the installation of CSP. First, create a working environment for CSP, setting the name to “csp” and the default python version to 3.6.
$ conda create -n csp python=3.6The command above creates an environment named “csp” and installs python3.6 along with other base applications. Next, activate the csp environment.
$ conda activate cspNotice that the name of the environment appears right before the command prompt once it is activated. You’ll always know which environment you are in.
Now install CSP. Since, it requires RDKit libraries for it to work, it automatically installs RDKit as a dependency. You don’t have to execute another command to install it.
(csp) $ conda install -c conda-forge chembl_structure_pipelineThat’s it! You have successfully installed CSP via Anaconda. Well, of course, you are supposed to use CSP within the environment you created so you will be processing your compound structure files (SDF or SMILES) while the environment is in activated state. Once you are finished with the processing of your files, you can simply deactivate the environment with the command below. The prompt should return to its original state, without the name of any environment prefixing it.
(csp) $ conda deactivate As a side note regarding Anaconda, let’s say, you have several applications requiring different conflicting versions of python or other applications. You can simply create separate Anaconda environment for each, allowing you to install those applications with the respective required python version.
Standardization of compound structures
You can find in the documentation of CSP that it is very easy to perform standardization of compound structures by simply following the usage instructions. However, in our case, we find the results lacking in certain aspects so we decided to create a script using the original standardize module of CSP together with the LargestFragmentChooser submodule of the MolStandardize module in RDKit.
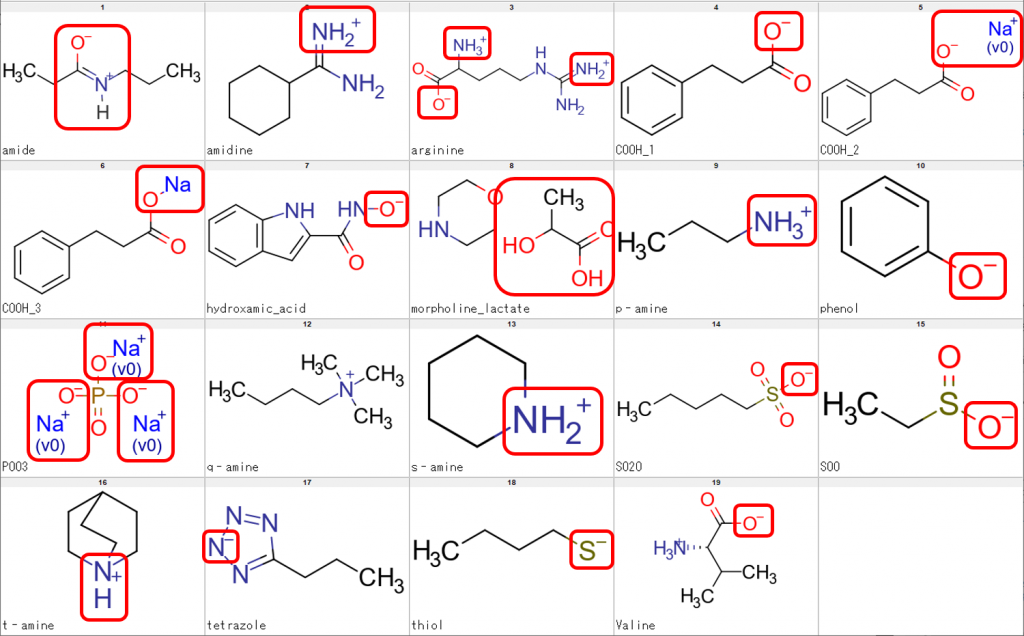
Let me show some sample structures that we need to be processed accordingly. In the following figure, the structural features we need to be dealt with are enclosed in red boxes.

The sample structures above were used to check whether CSP can perform processing of compounds such as tautomerization, neutralization, desalting and retrieval of parent structure. We also checked whether CSP would leave the N of a quaternary amine (q-amine in Fig. 1) untouched.
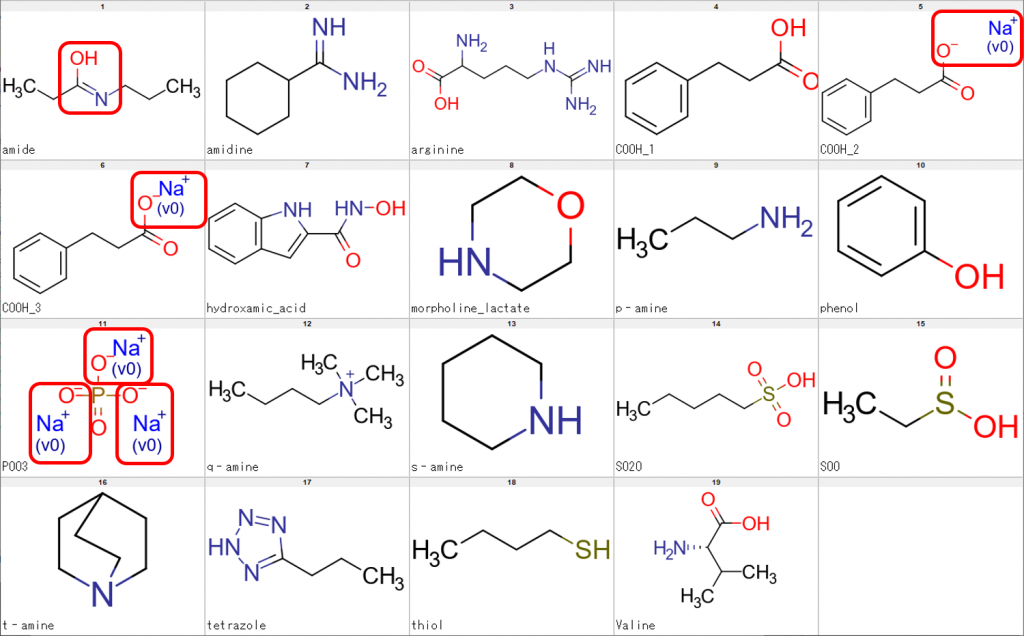
We performed processing of the sample structures using CSP alone and the results are shown in Fig. 2.

As can be seen from the figure above, the uppermost left molecule showed an imidic acid form rather than an amide form. Additionally, the existence of Na+ ions indicate failed desalting of the compounds concerned.
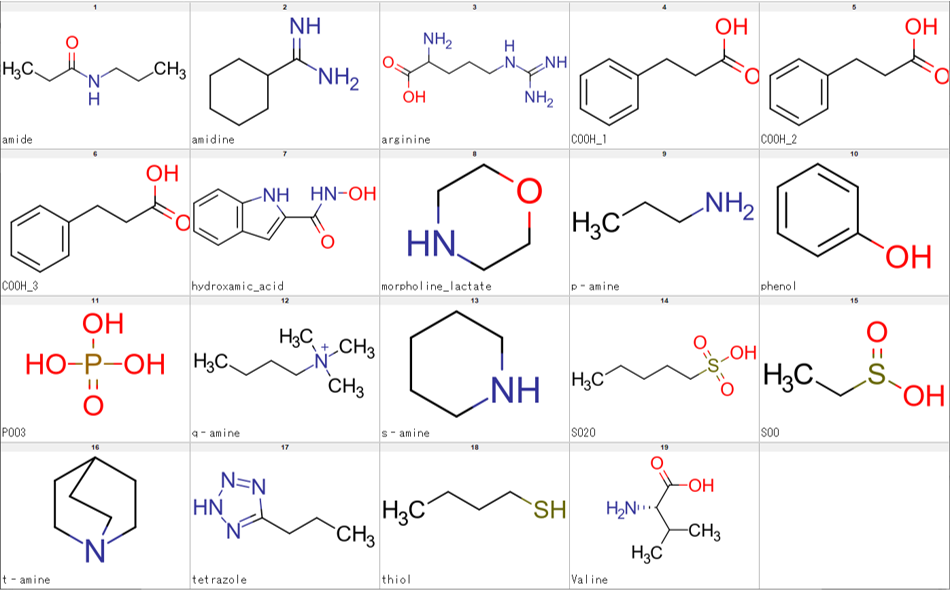
We have tried several ways to achieve the results we wanted and found that the combination of the standardize module of CSP with LargestFragmentChooser submodule of the MolStandardize module satisfied our requirements. Results are show in the Figure 3.

The script we created enabled us to achieve the results we wanted by executing standardize_mol, LargestFragmentChooser then standardize_mol again, in that sequence. The final script also allows processing of either SDF or SMILES file with the option of, also, SDF or SMILES file as output. It also skips on any compound that cannot be processed due to certain errors, thereby, enabling smooth processing of large input files. Regarding speed, processing of several SMILES files each containing about 210 thousand compounds on a machine with an Intel(R) Core(TM) i7-4790 CPU @ 3.60GHz processor takes about 7 minutes per file. The script (curation_pipeline.py) can be executed as follows.
$ conda activate csp

(csp) $ python curation_pipeline.py input.sdf output.sdf
The contents of the script are shown below. You can download the script by clicking the button on the right.
import sys
import os
import copy
import subprocess
import re
import argparse
from chembl_structure_pipeline import standardizer
from chembl_structure_pipeline import checker
from rdkit import Chem
from rdkit import RDLogger
from rdkit.Chem import MolStandardize
from os import path


def parse_infile(infile):
    in_ext = os.path.splitext(args.inputfile)[1][1:]
    RDLogger.DisableLog("rdApp.*")
    if in_ext.lower() == "smi":
        molecules = Chem.SmilesMolSupplier(
            infile,
            delimiter="\t",
            smilesColumn=0,
            nameColumn=1,
            titleLine=False,
            sanitize=True,
        )
    elif in_ext.lower() == "sdf":
        molecules = Chem.ForwardSDMolSupplier(infile, sanitize=True, removeHs=True)
    return molecules


def standardize_mol(molecule):
    desalter = MolStandardize.fragment.LargestFragmentChooser()
    std1_mol = standardizer.standardize_mol(molecule)
    desalt_mol = desalter.choose(std1_mol)
    std2_mol = standardizer.standardize_mol(desalt_mol)
    return std2_mol


def process_mols(mols, outfile):
    out_ext = os.path.splitext(outfile)[1][1:]

    if out_ext == "smi":
        out = Chem.rdmolfiles.SmilesWriter(
            outfile, delimiter="\t", includeHeader=False, nameHeader="_Name"
        )
    elif out_ext == "sdf":
        out = Chem.rdmolfiles.SDWriter(outfile)

    for mol in mols:
        if mol is None:
            continue
        molname = mol.GetProp("_Name")
        try:
            curated_mol = standardize_mol(mol)
        except:
            print("error in %s, skipping current compound." % molname)
            continue

        curated_mol.SetProp("_Name", molname)
        out.write(curated_mol)

    out.close()


if __name__ == "__main__":
    p = argparse.ArgumentParser(description="This is a script for compound standardization.")
    p.add_argument("inputfile", help="Input SDF or SMILES")
    p.add_argument("outputfile", help="Output SDF or SMILES")
    args = p.parse_args()

    molecules = parse_infile(args.inputfile)
    process_mols(molecules, args.outputfile)
And that’s it about the ChEMBL Structure Pipeline! I’ll be back soon with a machine learning blog which is about LightGBM.
Category: Machine Learning, RDKit